Voice Over IP Networking

Posted on Leave a comment

Voice Over IP Networking

Voice Over IP Networking encompasses a family of different technologies which allow Internet Protocol networks to be used for voice-related applications like telephony, voice instant messaging, and internet teleconferencing. Designed to help at every level of digital voice communication, VoIP breaks down the barriers traditionally associated with physical distance and phone circuits.

A number of popular phone systems use VoIP technology. Developers have created an industry that utilizes desktop applications, telephone services, and corporate phone networks. Voice over IP networking is the core programming that drives the whole system. Cross-platform functional and highly customizable, VoIP networking can be adapted for small businesses as well as corporations that employ thousands of people.

When it comes right down to it, Voice Over IP Networking was invented as a way to simplify corporate networks and improve telephony experiences for users of that network. Fortunately, it is also more cost-efficient and can save companies and even households substantially on their phone bills.

The primary roadblock to widespread consumer adaptation of Voice Over IP Networking is change. It’s easier to convince large businesses and corporations to switch, because the larger the network, the larger the savings. But small businesses and households are more difficult to sway, because they argue that their existing phone systems work just fine. VoIP networking saves money over the long term, and it improves phone efficiency at the same time.

VoIP Business Telephone Systems

Posted on

Choosing a business telephone system for your company shouldn’t be a complicated process. The first step is to come up with a list of requirements that your phone system should have. If you’re deciding on a new system entirely, you should strongly consider Voice Over Internet Protocol, or VoIP. 

VoIP is computer telephony integration that basically uses your business intranet to handle voice communication. The advantages to this system are many. VoIP allows for scalable design and lets you can incorporate voice communication into PC-based applications.

During the process of choosing a business telephone system, make sure that you inquire about all the different functions that are available. In addition to voice mail, it’s now possible to digitally encode voice mail into email, access any voice mail or email address remotely, and even convert faxes into viewable PDF documents which appear in your employees’ inboxes.

Most companies will eventually need to switch to a VoIP business telephone system. Until recently, only big corporations had the kind of capital and technical know-how to make VoIP work effectively and securely. Today, however, it’s easy for small businesses with as few as five employees to take advantage of the cost savings and increased capabilities of these IP based systems.

Setting up your Samsung voice mailbox

Posted on

To get the most out of your voice mail it’s important that you properly set up your personal mailbox.

STEP 1: Record your mailbox greetings

  1. Press the voice mail button on your phone and enter your password (0 0 0 0 by default). Press 5 from the mailbox menu.
  2. Press 1 to assign your no answer greeting
  3. Press 2 to edit the greeting, begin recording when prompted. A typical greeting says “Hi, you’ve reached Mitch Scott. I am currently on the other line or away from my desk. Please leave your name number and a brief message and I will return your call as soon as possible.” press # when finished.
  4. Press 1 to set this as your active greeting
  5. Press 5 to edit mailbox greetings
  6. Press 7 to record your mailbox greeting and follow the prompts to record your mailbox greeting (You can repeat the greeting you used in step 3). Press # when finished.

STEP 2: Record your mailbox name

  1. Press # from the main menu
  2. Press 7 for personal administration
  3. Press 2 to record your name “Mitch Scott” press # when finished

STEP 3: Enter your directory name

  1. Press # from the main menu
  2. Press 7 for personal administration
  3. Press 3 to enter your directory name
  4. Press 2 and follow the instructions to enter your name in the directory

STEP 4: Change your password

  1. Press # from the main menu
  2. press 7 for personal administration
  3. Press 1 to change your password
  4. Press 2 and follow the instructions to change your password.

Hang up

Quick Reference Guide for the Samsung iDCS Phones

Posted on

OUTSIDE CALLS – To place a call to an outside party.

  • Lift the handset.
  • Press an idle (no light) outside line button, line group button or dial a line access code (701 – 7xx) to receive dial tone.
  • Dial the telephone number.
  • Replace the handset or press the ANS/RLS key when the call is complete.

INTERNAL CALLS – To place a call to another extension at your location:

  • Lift the handset.
  • Dial the extension number (201-2xx) or group number (500-5xx).
  • Wait for the party to answer. If you hear a brief tone burst instead of ringback tone, the station you called is set for Voice Announce or Auto-Answer. Begin speaking after the tone.
  • Replace the handset or press the ANS/RLS key when the call is complete.

SPEAKER PHONE CALLS – Your Samsung telephone has full speakerphone capability. This feature may be used for both internal or external calls. To activate this feature.

  • Press the SPEAKER key.
  • Place an internal or external call .
  • Press the SPEAKER key to disconnect the call.
  • NOTE: The handset may be used at any time during the conversation. To resume handsfree operation press the SPEAKER key and replace the handset.

ANSWERING CALLS

OUTSIDE CALLS – To answer incoming calls:

  • Lift the handset or press the ANS/RLS key to answer on SPEAKERPHONE and you are automatically connected to the ringing call.
  • Replace the handset or press the ANS/RLS key when the call is completed.
  • NOTE: If a call is flashing at your telephone but not ringing, you must press the flashing button to answer.

INTERNAL CALLS/VOICE ANNOUNCE CALLS – To answer when another extension calls your telephone:

  • Lift the handset or press the ANS/RLS key to answer on SPEAKERPHONE.
  • Replace the handset or press the ANS/RLS key when the call is completed.
  • NOTE: The volume may be adjusted at any time by pressing the up and down arrow keys.

PLACING A CALL ON HOLD

Calls may be placed on System Hold or Exclusive Hold. Calls placed on Exclusive Hold may only be picked up from the extension that placed them on hold. A call placed on System Hold may be picked up at any extension.

SYSTEM HOLD – To place a call on hold:

  • Press the HOLD button. The call will flash green at your telephone.
  • To take the calller off hold, press that button and the green flashing light will go steady green again.
  • Resume conversation.

EXCLUSIVE HOLD – To place a call on hold at your telephone so other that other users cannot get it.

  • Press the HOLD button twice. The call will flash green at your telephone.
  • To retreive the call, press the flashing green line button or press the HOLD button a third time.
  • NOTE: Internal calls will always be placed on exclusive hold.

Feature Access Code

0 Operator
10 + xxx Pick Up A Parked Call
12 + xxx Pick Up A Held Call
13 Door Lock Release
16 + xxx Speed Dial + Speed Dial Bin
17 Save and Saved Number Redial
18 New Call (recall)
19 Last Number Redial
400 CANCEL Do Not Disturb
401 SET Do Not Disturb
42 + xxx Cancel Message You Left
43 Return Message
44 Callback
45 Busy Station Camp-On
46 Conference
47 Account Code
48 + xx Cancel Programmed Message
49 Send Flash
53 + xxx + 1 In Group
53 + xxx + 0 Out of Group
56 Meet Me Answer
600 Cancel All Call Fowarding
601 + xxx Set Forward All
602 + xxx Set Forward Busy
603 + xxx Set Forward No Answer
604 + xxx Set Forward Busy/No Answer
605 + xxx Set Forward Follow Me
65 + xxx Pick Up Ringing Extension
66 + xx Pick Up Group
67 Universal Answer
* Authorization Code

Vodavi 24-Button Digital Keyset/Button Diagram

Posted on

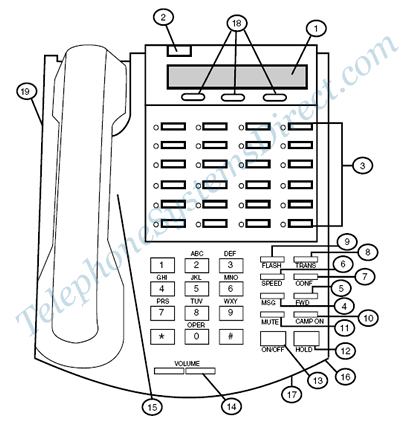
The following illustration and its corresponding table describe the physical features of the Vodavi 24-Button Digital Display Telephone.

Vodavi 24-Button Digital Keyset/Button Diagram

1. (DISPLAY) Displays information about telephone status, dialing directories, and text message information.

2. (MESSAGE INDICATOR) Programmable indication for Ring Line, Voice Mail, Message Wait, or handset operation.

3. (FLEXIBLE BUTTON Keys) Used to access outside lines or access call-handling features.

4. (MSG Key) Used for Auto-CallBack to a telephone which has left a text message or to access voice messages.

5. (FWD Key) Used to forward your calls to another destination, such as a station or voice mail.

6. (SPEED Key)

Changing the time and date – Vodavi STS phone system

Posted on

These are the instructions on changing the time and date on a Vodavi STS phone system. Unless your phone system was purchased from www.telephonesystemsdirect.com you must use Vodavi extensionon 100 for this programming change.

Do not lift handset or press speaker.

Dial **3226 on your Vodavi STS 24 button digital key telephone.

Press the FLASH key and dial 11

Enter the new time and date for your Vodavi phone system in the format below.

Note: the time is in 24-hour format (8:00 PM would be 20:00).

YY MM DD HH MM

Press HOLD

Press the ON/OFF button to exit

NEC DSX 22B Display Tel common feature buttons

Posted on

Line appearance keys

The first row of button usually has your line keys labeled line 1 – line x

A line key provides an extension user with one-button access to outside lines. The extension user just presses a line key to place or answer a call on the line. There is no need to dial codes to access or intercept outside calls. In addition, a line key provides a Busy Lamp Field (BLF) for the line to which it is assigned (see the table below).

Off – Idle or not installed
On (red) – In use or on Exclusive Hold at a co-worker’s extension
On (green) – In use at your extension
Wink On (red) – On System Hold at a co-worker’s extension
Wink On (green) – On System Hold at your extension
Double Wink On (green) – On Exclusive Hold or recalling your extension
Slow Flash (red) – Ringing into the system
Slow Flash (green) – Ringing or recalling directly to your extension

To place a call using a line key:

1. Lift the handset.
2. Press the line key.
3. Dial the outside number.

To answer an incoming call using a line key.

1. Listen for ringing and look for the flashing line key.

  • Line keys that flash red are for you and your co-workers.
  • Line keys that flash green are just for you (such as DILs and transfers).

2. Lift the handset.

3. Press the flashing line key.

  • If you have Ringing Line Preference, lifting the handset answers the call.
  • If you have Automatic Handsfree, while on a call you can press another line key to put your first call on Hold.

Auto-Attendant Answer

If your incomming calls ring to either an operator phone (usually extension 300) or a group of phones pressing this button will make the auto-attendant answer instead.  Callers will hear your company greeting (Hi thank you for calling xyz company….) instantly.  If your auto-attendant answers calls all of the time you will not have this button on your phone.

Operator Message

This button will flash when a message has been left in your general delivery mailbox.  To check the message simply press the flashing operator message button.  Although extension 300 is usually the operator extension the general delivery messages are NOT stored in mailbox 300.  This is to give you the option of having a generic mailbox and a personal mailbox for the employee at extension 300.  Pressing the operator message button will also allow you to record the greeting that is heard when an outside caller reaches the general delivery mailbox.

Operator Call

The operator call button give you a visual or audio indication that someone has pressed 0 (for the operator) from the auto-attendant.  To answer the call you simply press the operator call button or the line button (this can also be programmed to answer when the handset is lifted).

Hotline buttons

Hotline gives a keyset user with a programmed Hotline key one-button calling and Transfer to another extension (the Hotline partner). Hotline helps co-workers that work closely together. The Hotline partners can call or Transfer calls to each other just by pressing a single key.

Hotline Busy Lamp Indications

Off – Idle or not installed
On – Busy or ringing1
Medium Flash – Partner extension is in DND for outside
calls (option 1).
Fast Flash – Partner extension is in DND for Intercom
calls (option 2) or All Calls (option 3).

Speed Dial Keys

The 10 keys  below the display are your speed dial keys.  These can be used to store frequently dialed telephone numbers.  For a tutorial on programming the speed dial numbers click here.
Transferring calls on a NEC DSX 22B Display Tel without a hotline button

Posted on

Transfer permits an extension user to send (i.e., extend) an active call to any other extension in the system. With Transfer, any extension user can quickly send a call to the desired co-worker. A call a user transfers automatically recalls if not picked up at the destination extension.
An extension user can Transfer both outside calls and Intercom calls.

You can transfer calls in two ways.

Screened Transfer – The transferring user announces the call to the destination before hanging up.
Unscreened Transfer – The transferring party extends the call without an announcement.

To Transfer a call:

  1. Do not hang up.
  2. Press the TRANSFER button.
  3. Dial your co-workers extension
  4. Announce the call to your co-worker (screened transfer) or simply hang up to send the call through unscreened.

Tips: You can press the flashing line key to return to the call if your co-worker doesn’t want it.  You can press the V-Mail button to send the call to your co-workers voice mail.

Using caller ID and the phonebook on the x616

Posted on Leave a comment

1. Press the Caller ID button and then press up or down navigation button to scroll through the numbers.

2. Press select (center navigation) button to show “Dial Alternate”. Press the right navigation button until the proper dialing sequence is displayed.

3. Press the down navigation button unit is says, “Copy To Phonebook”

4. Press the center navigation button to save the number in the phone book. If both name and number are displayed, they will both be saved into the phone

x-616 Phone Keypad Layout

Posted on

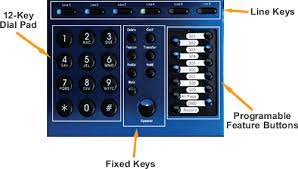
12 Key Dial Pad

Used for…. dailing!

Fixed Keys

Delete, Conference, Feature, Transfer, Redial, Hold, Mute and Speaker

Programmable Feature Buttons

Each digital telephone endpoint has twelve (12) programmable feature buttons, which can be customized by each extension user. There are three programmable feature button categories.

DSS/BLF Key Direct Station Select (DSS) – allows extension users to press one button to dial another extension. In addition, the DSS button doubles as Busy Lamp Field (BLF). The BLF shows the status, idle or busy, of other extensions.

SPD Key Each of the (twelve) 12 buttons can be programmed as a speed dial key. Input the
number to be dialed once the key is identified as a speed key. Simply press the speed key to dial the number once it is programmed. “Feature + 7” will enter a pause, shown as a P.

Feature Key
Feature + 1 = Record
Feature + 2 = Open
Feature + 3 = Flash Key
Feature + 4 = DND
Feature + 5 = Mute
Feature + 6 = Conference
Feature + 7 = Pause
Feature + 8 = Redial
Feature + 9 = Headset
Feature + 0 = All Page
Feature + * = Open

Line Keys

When placing a network call, Telephone Company or VoIP line, press the line button, or dial 9 to access a line. You can speak on the speakerphone, or lift the handset to speak privately. Line buttons that are unlit are free to use. If they are lit blue they are busy and the line that you selected will be lit green.